Showing posts with label living in a van. Show all posts

18 September, 2017

Interview and Van Tour

Our friends Jack & Kitty have a youtube channel and they put our van in it.

Who are Jack and Kitty?

I’ve known Jack and Kitty for many years and watched their careers as entertainers grow. They’re happy, joyous, lovely, folks and it reflects in their music and antics on stage.
They are musicians, writers, directors, filmmakers. They did a kids show for PBS which won them an Emmy. Yup, they won an Emmy.  

Their Youtube channel is a mix mash of all things happy, vaudeville, musical, and they decided to do a little video tour of our van/tiny house thingy.

We can’t thank them enough for popping by and taking a little tour of ‘Woody’, and really encourage you to stop by their channel, like, and subscribe.
Oh and while you’re there pop by our channel and do the same.

Here is their video. 

I really like their channel. Hey the light you see me using in my van in the video is terrific. We got ours on Amazon. Here's a link.
Keep the shiny side up.
---Trevor & Elissa


11 September, 2017

Great River Bluffs State Park

Great River Bluffs Minnesota State Park


It’s located at the top of sandstone bluffs overlooking the great Mississippi river and our neighbors to the east Wisconsin. This park is filled with life and amazing overlooks. Bring your binoculars and cameras because if you don’t you’ll kick yourself.
While we didn’t camp out here we did walk through the campground and it’s pretty great.
When you enter the park you go through butterfly and meadow land and pull up to a smallish parking lot. (It’s just the first there are more further on down the hill.)
The paths are well kept and bring you through several twists and turns and (at least the one we were on) brought us to this giant vista. It overlooked the Mississippi river and the south-western bluff side of Wisconsin.
It was amazing.
Tons of bird life. Being on the Mississippi I wouldn’t doubt that it’s on the migration route of a lot of different bird species.
You’ll see just watch the video.
Thanks for watching and stopping by.

Keep the shiny side up.

Trevor & Elissa 


20 March, 2017

Update on the van

How about an update on the van to rv project?

This is a smallish one and it’s all about making a butcher-block counter top.
We went to Lowes and got a nice piece of Aspen and then I put food grade Butcher Block oil on it. In the video you will see that I have six layers of it on the wood. It’s a very pretty wood and with the oil on it I think you’ll agree it’s brilliant.

Have a great day. 

13 March, 2017

Van to RV Plans

     With Summer not to far off it’s a good time to start planning where and what you’re going to be doing. My wife and I will probably be camping a lot this year which brings up my van to rv conversion project. I live in Minnesota and the van is much to large to get into my garage so any work that I’ve been doing has been outside and in the snow. Yes, you’re right that does mean that it’s been going slower than usual even for me. If we go back in time to my other entries you’ll notice over and over one common denominator. I have very little experience with construction. Which means that this whole project is a big challenge for me and something I am very excited to learn about.
Today, let’s talk about the counter top, flooring, and the water situation.

Countertop, sink, and the junk that holds it all in place.
    
    We’ve decided on the counter top and the type of wood it’s going to be. We’ve also decided on the height, length, and depth of it as well. The counter top is going to be Aspen with a butcher block oil all over it to protect it. The height will be between 33 and 43 inches, the length around 5 feet, and the width/depth (I get those confused all the time) about 18 inches.
Counter top
 Aspen, as you can see in the picture is a light wood and sort of reminds me of Pine a little bit. The height was completely dictated by the window it’s going to be sitting in front of, the length will be five feet because that’s all the space we've got on that side of the van.
    “What’s going to hold it up”, you ask? Well, that’s the part I’m excited about. If all goes well it’s going to be a light skeleton frame tall enough to fit two or three of these plastic drawers under and strong enough to hold the counter in place. 
Storage under the sink.
      As far as an outside covering I think we’re going to use anything we can find for the sides but leave the front open. When I say open what I mean is we’re going to have some kind of draw string curtain covering. Now this is just an idea and it can change. The reason we’re leaving the front open is weight. We’re trying to keep the weight down. Weight and gas mileage don’t play well together and as it is we get between 12 - 18 miles per gallon. Imagine with all this wood.

Under the sink
The Sink
The cute drain plug
     The sink is made out of a big red plastic rectangle thing we found at Goodwill. I’ve drilled a hole large enough to put a drain in and after I get the counter top oiled up I’ll cut a space in it. Of course it’s one thing to say something like this and quite another to actually do it. When that happens I’ll be sure to get photo’s and we’ll have fun watching it.

Water

    We’re still deciding on the containers, but have decided on where and how it’s going to work. There will be two containers located right underneath the sink. One will be fresh water and the other will be gray water. That’s it. Chances are they’ll both be bungee corded in place.

Flooring

     We were looking for the perfect flooring for our little camper van thingy. That's a technical term by the way. 'Thingy'. We checked out Menards, Lowes, and any other place that we thought might sell that sort of thing. Eventually we found an open box item. It was way cheaper and although it’s not our favorite color we’re good with it. You can see it’s darker, but that’s okay with us. We did get this at Lowes, and we figure one box will cover the floor in our little van. 
      As you can see the plan is finally at a place where we can really start putting it all together. Now all we do is hope for some sunny days. When that happens I’ll be sure to take more photos.

Keep it tuned here for more updates.
Thanks for taking the time to read and hang out here. You're awesome!!


-Trevor Marty


19 December, 2016

Happy Holiday's and The Electric Plan

Dearest Fellows-

     This weekend was terrifically cold and so with wind chills going as far as 40 below zero I decided it would be best if I didn’t hang out to long outside and work on the van.
I did shovel it out of snow, turn it on, and drive it out of it’s stuck spot. Then I looked around it, wished it well, and promised to return in a few days when the temperature gets back above zero.
We have a lot to shovel out and last year I was in a wheelchair (go here for that story) and wasn’t able to do any shoveling. Elissa did everything which was wonderful. This year I plan to shovel all of it. That’s what I did Saturday. I shovel ours and helped with two other places down the block. Saturday was only like 10 below so it was way more doable.

     The holiday season is coming upon us quickly and this demands more time, so I hope to get out to work on the van this week but I’m not sure it’s going to happen. There are lots of things that are also demanding my time, and I hope the weather gets a little bit warmer. I mean if it’s at least at zero I can get a few things done.
    
     The plan then is to get heavy gauge electric wire and run it from the solenoid and the starter battery to the house batteries with a giant fuse in between and the whole mess grounded to the frame. You can see why I hope for the temperature to warm up a bit since I’ll be crawling under the vehicle on the snow. (My shed isn’t tall enough for van.) From the house batteries I will connect a lighter gauge wire to a DC fuse junction box. The kind you find in cars. At that point I’m a bit lost, and don’t entirely know what to do. I think I’m going to need to connect a couple of dc cigarette type plug in to that fuse box, but I’m not sure. I do know however that we will be needing an inverter. Here’s the one we’re thinking about getting. You’ll notice that it’s sort of small. Well this is why. We aren’t full time boon-docking yet. We are only going to be “trying it out” and thus won’t have the same demands as other folks do. We won’t be putting a refrigerator on it, we won’t be using hair dryers, toaster, or coffee makers. We will only be charging a few devices once in awhile also when we upgrade I’d like to be upgrading to solar charging and get the right inverter for that. This will be connected to the house batteries with the same heavy gauge wire and have a B.A.F. (Big A$# Fuse) between the batteries and the inverter. The whole thing will have a large red On/Off switch, so we can turn the whole mess off if we so choose.Here's that link.
    
     Well that’s about it for this week I wish you a happy, healthy, and wonderful holiday season. Remember this can be the hardest and most depressive time of the year, so give someone a hug and let them know they’re loved.

All my best
Trevor

A photo just for fun.

12 December, 2016

Insulating the van and snow.

Greetings fellow spirits on this grand adventure called, 'Life'.

     These are photo's, and two videos on insulating our van which we have lovingly called, 'Woody'.  First off we did buy heavy R value insulation and made sure that there was no formaldehyde in it. The R value is a way of rating how good it is at keeping the cold out or in. We went with the biggest we could afford.

     The foam board stuff was two inches thick (I think) and easy to cut and shape, but be aware it makes a nasty squeaky sound and a hell of a mess as you'll see. I found it difficult to measure all of the shapes in our van and struggled to remember what Mrs. Kleppe, my 7th grade math teacher, taught me about measuring arches. In the end I just kept cutting and shoving pieces into the hole till it was filled not very clever or interesting to see. If you're interested this is the formula for measuring an arch. (ie the wheel well)
The radius of the arch is the radius of it's finished circle which it is a part. R = H/2 + W(small2)/8H Yes, I agree with you. I'll just skip over that and stuff that hole with parts of insulation till it's full, or you could always go here and plug your numbers in. Height and Width.
  Link to carpentry website.


From that point I took out the fiberglass stuff and started cramming it into every little crevice I could find. I reminded myself of a bird preparing a nest for a hoped for lady-friend and babies.
Stuffing it in.

I wore gloves, a breathing mask, glasses and covered all of my skin just like they tell you to.
Using a straight edge, a measuring tape, and my Swiss Army knife I did all of the cutting for everything. I'm pretty sure I'll need to sharpen that knife now.
Straight edge, Swiss Army Knife, and the dreaded insulation.
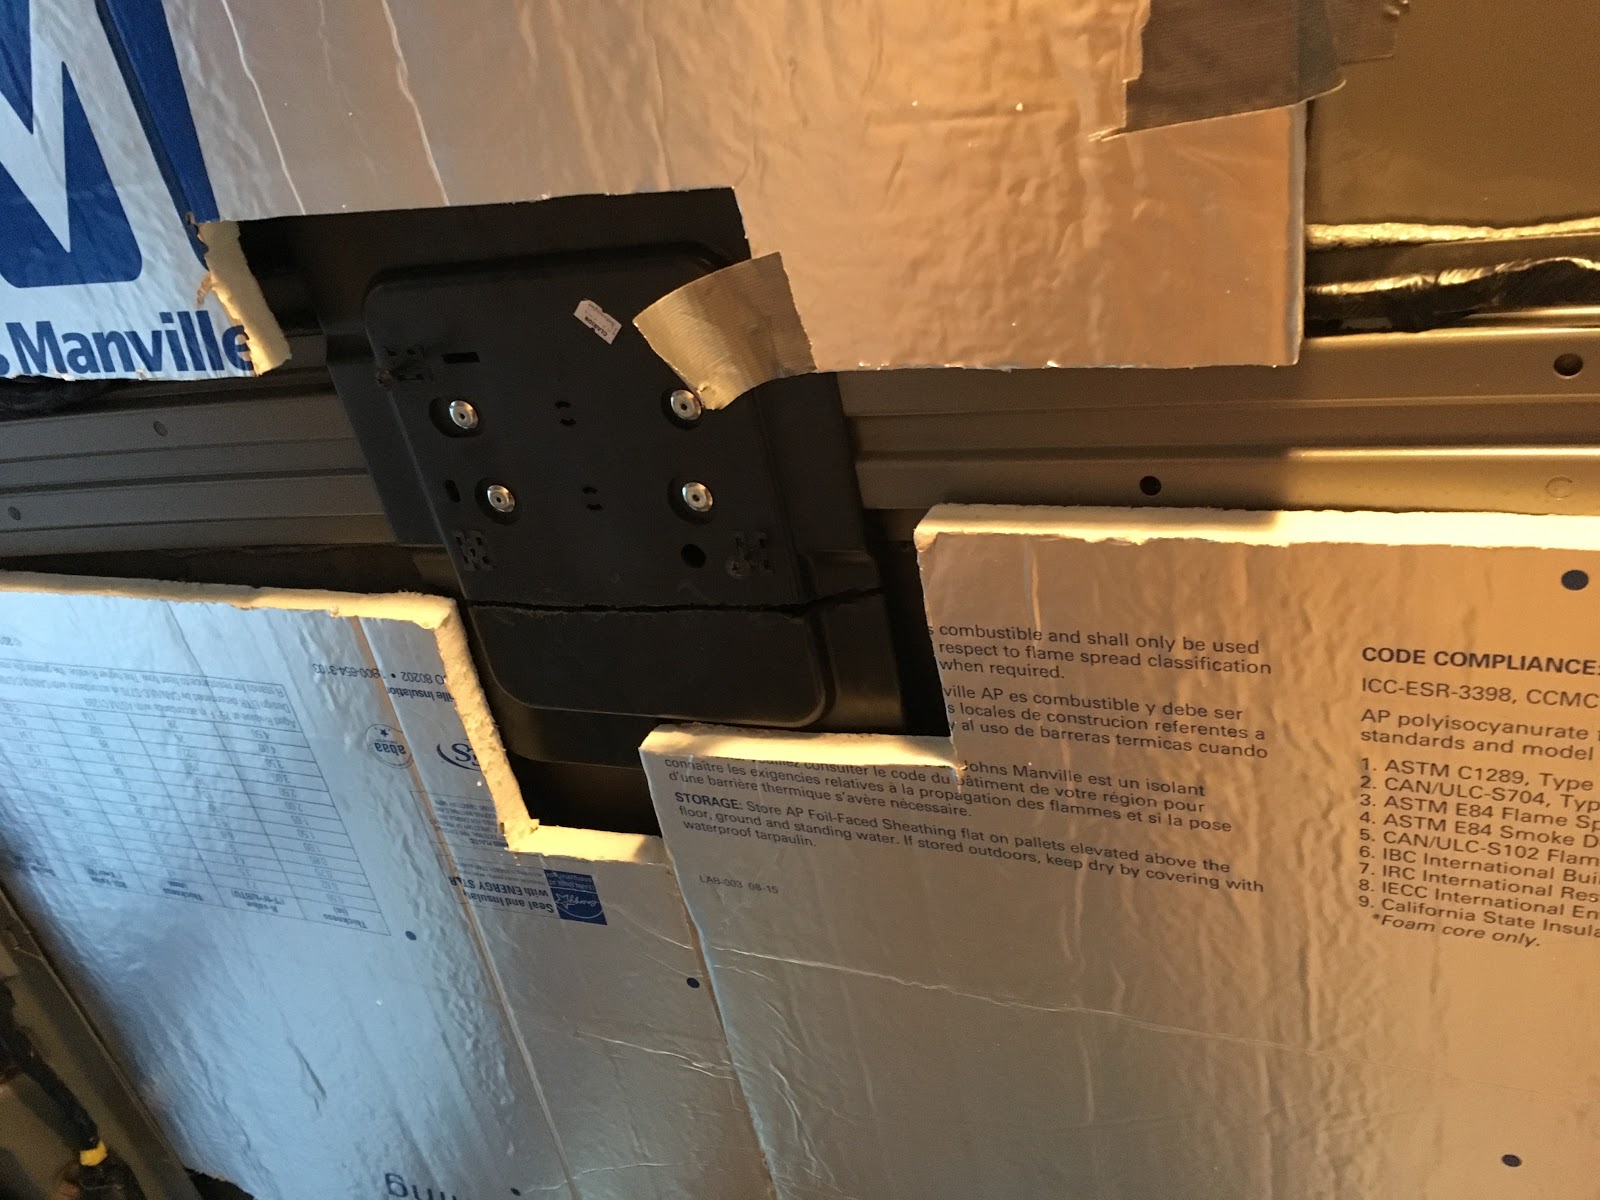
We have a 2001 Chevy Express 1500 with two TV's and a big sub speaker in the back. I took the TV's out and am keeping the speaker if I can. The TV's were mounted to a smallish black plastic square which is stuck to the ceiling. I tried to take it out but the bolts were stripped so I thought I'd cut it out with my rotary tool. Here it is before and after.
Mounting square for the TV before cutting it.

After
As you can see I was not successful in cutting it off. That cut goes all the way through, but it still wouldn't move. Yes, I even tried to break it. Cut through like that it still held my weight.

Gave up and cut around it.
Here you can see I just went around the whole thing. I hate being beat by a plastic square.

The best I could do.
You know when you look at other peoples insulation it looks so sweet and nice. Everything fits just right, and they don't have any duct tape holding it in. I totally thought this would be the easiest part, and it turned out not to be. Oh well. Next is the wiring. Here's the final video of the insulation.
We wish you all the best in everything you do.

Peace, Love, and Doritto's
The Marty's

28 November, 2016

Gutting the Van and Nanowrimo

Gutting the inside of the van and Nanowrimo.

Hello Gang-

    How are you doing today? We here at the Marty Estate are doing fine. Two thumbs up.
Today’s blog is all about the gutting of the van we’re turning into an RV. The van is a 2001 Chevy Express. They made three different types a 1500, a 2500, and a 3500 I believe ours to be the 1500 and it does have a 5.7 liter V8 engine in it. Quite the difference between that and our little four cylinder wagon.
    First though a little about Nanowrimo. It stands for National Novel Writing Month, and I have been participating in it. It’s a sort of race to see if you can get a novel written in thirty days. Now the goal is 50,000 words and I will admit that does seem like a big deal and it is, but as far as novels go that is a bit light. The type that I choose to write, an anthropomorphic murder mystery should weigh in at between 80,000 and 89,999 thousand words and that is what I’m shooting for. Having said that though I have only gotten as far as just over 32,000 words and the end of the month is only a week away. I don’t think I’ll be making it, but I still feel good about getting to 32,000 words. That’s a pretty big deal, so this weekend instead of sitting and writing all weekend I wrote a few thousand words per day and then started work on the van.
    As you’ll see in the video below there are several speakers, two T.V.’s, and a power amp thingy. The speakers are all Bose which I thought was a fun discovery, but I’ll probably take them all out. Also there is this weird air conditioner/heater thingy (don’t you love my technical parlance) in the back of the van. This two will be coming out. Besides those things the back area is gutted.
    This is exciting, because now the next step will be to sweep it out and then to start putting up the wall, ceiling, and floor. Oh and let’s not forget about the insulation and the wiring for the lights. Which means I have a lot to learn about. For example. We are planning on putting solar panels up on the the top, so we have to wire for that. Do we wait to put the finishing on the ceiling till after we put the panels up? I’m thinking, ‘yes’ because it seems easier to have that all finished before we put the ceiling on.
    There are a lot of options as far as learning to wire it and I plan on exhausting all of my options. I also plan on showing y’all every part of this transformation. Whether you’ve found this place by accident, my music, or someone pointed you doesn’t matter. What matters is that you’re here now, and I am grateful. Thank you for dropping by, and please bookmark this and check back. I post another entry every Monday, and some have video’s like this one.
Thanks again for stopping by.
I wish you good health and happiness. 

Trevor Marty
 

Trevor Marty