You know I’ve just noticed that I like to do blog entries as if they are letters to you. A letter from a friend you’ve never met. It sounds nicer then just reading yet another blog entry from yet another dude who thinks he’s got something to say that will change your life. That’s not our relationship. Ours is more of a nice little letter.
Today’s letter is all about my new antique guitar. I bought it through Reverb.com via Chicago Music Exchange. It’s a wooden bodied resophonic guitar from the 1940’s. It’s most probably a Regal. The Regal company bought bodies off of the Dobro Manufacturing which split off from the National guitar. There’s your history lesson.
The guitar had to have a neck reset, so I brought it to my friend Kari Larson from Stringworks Studio who is a working Luthier. She took several photo’s while she did the work. I thought you might be interested in what happened and how.
The first photo you see she is steaming off neck. She’s drilled a hole in the fingerboard at a strategic location and inserted her home made steamer. Nope, I can’t tell you what it is, or she’d whip me with a wet noodle. It’s a secret.
Here you see the body and neck separated and the finish blushed a bit from the steam. Later on you will see how she fixed the blushing.
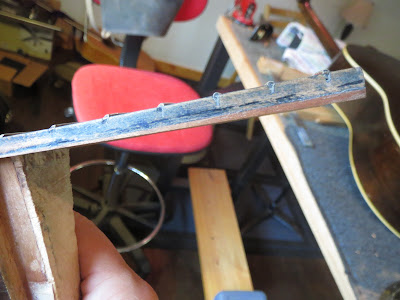
Removing the fingerboard takes some time and specialized tools. The one you see here is a hand made tool Kari told me about. It’s a worn out band saw blade with it’s teeth knocked out. It’s been rounded and sharpened to help remove the glued-down portion of the fingerboard.
First the fingerboard needs to be heated to help loosen the glue then the gentle probing and digging begins. She made this tool in luthier school.
Once the neck comes off it’s the perfect time to fix anything else that might be needing attention, and with an instrument that was made around the second world war you will probably find something. Even on an instrument that was treated well it’s entire life like this one. In this photo you see the sound well was loose and needed fixing.
Here is the original cone and bridge. This is a different style of cone and bridge then a biscuit bridge and it has a very different tone. This is called a spider bride.
Here is the new cone and spider bridge with wood blanks. Many steps follow this one. The wooden blanks for instance need a space carved for the strings. There is a great deal of mathematics and precision in the carving. If you get it wrong the intonation is off and thus the tuning too. Also the spider part itself needs to be evenly sanded.
Here is a photo of the guitar, neck, and new cone and bridge yet to be assembled.
These next two photos show the flattening of the spider feet. In the first one Kari has marked where it needs to be flattened with a black marker. The second is where she is flattening the feet on a flat surface with sand paper. Nice even strokes win the day.
She is using the glass from a framed picture because of the reliability of it’s flat and even surface and the sandpaper is 120 grit.
Once the neck comes off you will sometimes find other things that need a little love. As was the case with the fingerboard. In this photo you see an extension she put on in the shape of a wedge. This helped with intonation.
If you are ever looking on the Steward-MacDonald repair website you’ll see what are called ‘blanks’. These are saddles which need to be carved. Some will come with the spots already made for the strings, but others will not. In this case Kari carved out a blank to fit the particular needs of this guitar. In this photo you’ll notice how she marked the spots and then did the work. In an earlier photo you’ll see the new resonator spider, cone, and wooden blank before and this is the after.
Before she put the neck back on she fixed the finish. If you look in the photo you’ll see slight discoloration which is common when you steam off a neck. Here she is correcting that. In a later photo you’ll see it finished. You can’t see it at all.
This photo is on twice, because it’s at this point she is beginning to fit the dove tail back into the body. If you look on the body you’ll see how she corrected the finish from the steaming off process.
In these next photos you see the neck being glued back on. Did you know there were so many clamps in the whole world? (Pretty colors too.) With even pressure, attention to detail, and the mastery which only comes from A. knowing what you’re doing and B. doing a lot of them she puts the pieces back together.
This one is a bit closer and a different angle. If you look closely you’ll see that each clamp has it’s own barrier between the fretboard and itself for protection. Oh and let’s not forget that super cool toothpick holder.
A view from the sound well toward the neck.
Once everything was put together came the finishing finesse, and part of that was intonation. In this photo you see some spacers she put in to hold the cone in place and help to correct that.
Below is a little video I did with the new guitar. You'll be able to hear it in action. I'd also like to say thanks for popping by and don't forget to stop by next week for more.
Thanks and have a great day.
Trevor


No comments:
Post a Comment